 later in the HTML file are placed on top of
earlier elements. We can specify our own stacking order by using the z-index
style attribute, with the following syntax:
later in the HTML file are placed on top of
earlier elements. We can specify our own stacking order by using the z-index
style attribute, with the following syntax:| CIS 207 | Web Page Development - HTML |

Dynamic HTML (DHTML) provides a way to add animation to a web page, without the overhead of extra applets or large graphics. Starting with Netscape 4 and Internet Explorer 4, HTML code began to support dynamic elements. DHTML involves the interaction of three elements:
By working with these elements, we can create web pages that dynamically interact with the user. Some uses for DHTML that you may have seen include:
An extension of the CSS1 specifications, called CSS-Positioning, or CSS-P, added the ability to control the layout of the page. Eventually CSS-P became part of the CSS2 specification.
With CSS, you can define the position of any element that is enclosed within a two-sided HTML tag. The style attributes for positioning an object are:
position:position_type; left:value; top:value;
where position_type is the type of positioning used; absolute, relative,
fixed or static. The left and top values represent the location of the object.
The left and top values can be defined in absolute coordinates (pixels, inches, centimeters, etc.) or as a percentage of the width of the parent object. The default unit is pixels.
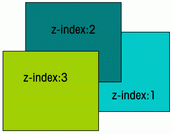
When positioned objects overlap, you can specify which object is placed on
top. By default, objects that appear
 later in the HTML file are placed on top of
earlier elements. We can specify our own stacking order by using the z-index
style attribute, with the following syntax:
z-index: value;
where value is a positive or negative integer, or the value auto
. Objects with the higher z-index value are placed on top of objects
with lower z-index values. If two objects have the same z-index value, the
object that is defined later in the HTML file will appear on top. Z-index values
can only be used to layer objects within the same parent element.
Usually the only reason for hiding an object is that you plan to make it visible later using a script. We can set the visibility attribute with the following syntax:
visibility: visibility_type;
where visibility_type is visible, inherit
or hidden. Visible makes the object
visible. Inherit (the default) causes the object to inherit the visibility
property of its parent element. Hidden hides the object, but, the object still
takes up space on the web page. In order to hide and object, and have it take up
no space on the page, use the display attribute value none.
Only Internet Explorer allows you to change the display attribute after the browser has loaded the page.
You can define the width and height of an object as follows:
width: value; height: value;
where value is the width and height values measured in absolute or relative
units, or as a percentage of the width or height of the parent element. If you
do not define the height and width values, the browser will decide based on the
content of the object.
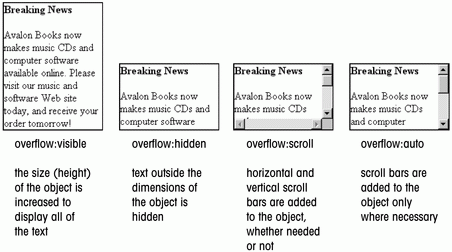
If the content of the object is greater than the dimensions you've allowed for it, you can control how the browser handles the extra content with:
overflow: overflow_type;
where overflow_type is: visible, hidden, scroll, or auto.

Although Internet Explorer supports all four attributes, Netscape through version 4.7 supports only the hidden and visible values for the overflow attribute.
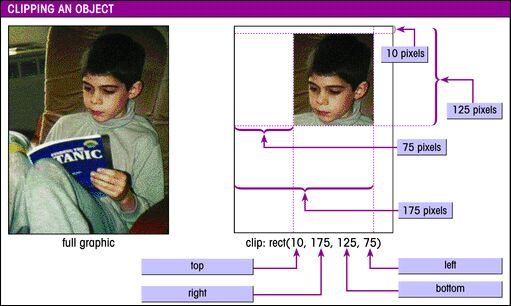
The clip attribute allows you to define a rectangular region through which the object's content can be viewed - similar to cropping a picture. The syntax for the clip attribute is:
clip: rect(top, right, bottom, left);
where top, right,

bottom, and left
define the coordinates of the rectangle.
The coordinates are relative to the top left edge of the object. We can use the
keyword auto in place of one of the coordinate values to use the object's
default value.
As you can see, clipping an object actually crops (or chops-off) the object at the points specified. Note that it does not re-size the object or attempt to stretch or distort it to fit the rectangle.